Monday, November 12, 2012

Graphic 45 and Petaloo Christmas Gift Blog Hop Day 1


Hello, and welcome on this fabulous Monday!!  Today you are in for a treat, it is not only the start of a new week, but the start of a 8 day Blog Hop with Graphic 45 and Petaloo!
Of course there will be prizes, TONS of Christmas gift inspiration and LOTS of yummy Graphic 45 papers, all in the spirit of things!
 
 
Here is what you could win, and don't forget, to participate you need to leave your comments of love to everyone along the your journey this week!! 
 
 
Also, make sure to stop by G45's Facebook page to find out another way to win some goodies!!
 
Now onto the schedule...
All week long you can hop along with the schedule, jump in at any time, or use it to come back and visit for that little bookmark of inspiration!  Either way, I hope you enjoy the journey!!


Monday, November 12:
Alberto Juárez: vintageodyssey.blogspot.com
Nicole Eccles: www.NicoleEccles.blogspot.com  <-------- You Are Here


Friday, November 16:
Gloria Stengel: www.gloriascraps.blogspot.com
Jane Tregenza: http://janetregenza.blogspot.com/
Betto Cesare: http://scrapguys.blogspot.com
Irene Tan: http://petaloo.typepad.com/

Saturday, November 17:
Sunday, November 18:
Helena Johansson: http://petaloo.typepad.com/
Monday, November 19: 
Mireille Divjak: http://petaloo.typepad.com/


Now onto my Christmas gift idea! 
This shabby chic shadowbox is a wonderful gift  for all those Christmas collectors!  Capturing the wonderful wintry feel of Christmas, with splashes out yummy purples and teals of A Ladies Diary combined with the Nutcracker sweet, and the brand NEW A Place in Time collection!

 
The whole thing was inspired by the gorgeous purple Petaloo flowers that I received in my care package.  Combined with their cream flowers, the idea was born!

 
Using a Graphic 45 art box for the top,, and one of their Metal film canisters for the base tied the whole thing together.  In the middle a hand painted candle stick creates the perfect vintage decorative stand.  Plus, the film canister still opens, making the perfect place for a handmade mini book, ornaments, or other fun little gift!
 
 
Inside the shadowbox is Christmas in Paris.  With small traces of ice all around,
and an image of the Eiffel Tower.  The word Joy captures the moment, as one of G45's Ornate Key Holes and keys frames the date, December 25th.  And don't forget the ice forming on the outside of this box to help create that lovely vintage feel, by using ground up Mica Glitter. 

 
This is a super simple gift that requires very little fussy cutting, and has such an elegant feel. 
Here is where it all began, with the little bird resting in the frosted flowers.  This little birdie was perfect, with untones of purple, he was cut from the New Place in Time line.
These companies pairing up will always be something magical!!!

Thank you so much for joining in the hop today, and stopping by!  I hope you have enjoyed my project and are ready to get into the swing of Christmas creations!!
 Lots more to see from here today, and don't forget, for the next 8 days as well!!!
Wishing you many visions of sugar plums and happy designing!!

XOXO
Nicki Chicky


Supplies Used:
 Graphic 45 Papers:
 A Ladies Diary- Lasting Impression, Garden Stroll
Kraft Reflections: Bits and Pieces
A Place in Time - May, January, October Cut aparts, Calendar Foundation,
Place in Time Sticker Alphabet
A Nutcracker Sweet-  Nutcracker Sweet

G45 Staples: 8x8 Matchbook Box, Metal Film Canister, Ornate Metagl Key Holes,
Ornate Metal Keys, Metal Door Pull,Trims

Petaloo: Paper Flowers and Stick Pins
Ranger: Frosted Lace Stickles
Scrapbook Adhesives; 3D foam squares

Other: Paint, Sandpaper, Candlestick, Mica gitter, Metal Star


Monday, October 22, 2012


Today’s the start of the blog hop between Faber-Castell Design Memory Craft and 100 Proof Press! We’re very excited for our first collaboration with them! Hop with us today for a blog hop packed with inspiration and techniques!

We’ll also have prizes for those who participate. Be sure to visit leave a comment on each designer’s blog. When you’re finished, comment on the company’s blogs to be eligible for the following great prizes:

Faber-Castell Design Memory Craft will be giving away a $40 prize pack, and 100 Proof Press will be giving away a $30 gift certificate!

Want an extra chance to win some prizes? Tweet Design Memory Craft at @DesignMemCraft about a technique you learned on the hop for a chance to win their NEW Stamper’s Big White Pen! Or like 100 Proof Press’s Facebook page (https://console.mxlogic.com/redir/?2ehpsjvuodELcIICzB4QsCOsVHkiP2DeXrO5qBunNrifQN6ZOUmzmHFsbh-B2Ubr84fyn69x2C8ELffFIfL8LfLLfCyATvAXTLuZXTKrKrFIt1idXHhHlRqfQFOVJNZAQsCQmm3hOed79EVsd7bVJ5MS2_id47EiDW1EwB2sqCV-7PNo_pgdFCQn3qbPbbbMUsr6_PziGQo for a chance to win the calendar you saw on this hop!


The blog hop will be open until midnight on October 26th, and the winners will be announced on October 29th on the company’s blog/twitter.


Here is a complete schedule of the entire Hop incase you are just joining in, or would like to keep coming back for more!


Now onto the inspiration!
From Faber Castell, I recieved sampler packs for Mixed Media Collageing.  From Gesso, to gel medium, water color pencils and glaze, I couldn't pass up the opportunity to make another MM Collage.
This mixed media collage was created on Heavy Chipboard.  The background has been handpainted using Acrylics, gesso and watercolor pencils. 


This wonderful large fish from 100 Proof Press is so fun to play with!  There are so many ways he could be colored or used, and he is HUGE and stamps so crisp and clean !! 

 
Fish really do make the best form or travel!  With a great ocean floor view, and beautiful bubbles skittering about and heck, they are pretty fast when they think something is chasing them!
 
That's all for today!  Thanks so much for joining in the Hop today, I hope you are running to play with all your stamps and goodies now!
Have an amazing Monday!!
 
Nicki Chicky


Tuesday, October 16, 2012

Day 2 w/ Gauche Alchemy and 100 Proof Press Hop

Well made it through another Monday, and here we are Tuesday already!
Today is day two of a fun little Hop with 100 Proof Press Stamps and Gauche Alchemy!
Here is a little info about both companies
 
Gauche Alchemy is all about the art - really fun art supplies! They have mixed media kits, that are filled with fun artistic finds, papers, ephemera, embellishments, fabric, and more. Gauche Alchemy "is for those that create outside the of the box, those that create inside of the box, and those that tear the box a new one..."
 
100 Proof Press The stamps are manufactured right here in the Midwest, with attention to detail second to none. The images are deeply etched and then expertly trimmed on a Hagner scroll saw, thus providing an amazingly close and perfectly perpendicular cut. Nothing prints better. The wood mount is smooth hard maple, 3/4" high with curved sides. The design is never bulky; we always use a mount which is custom cut to fit the image that goes on it. The index on top is permanently stamped in jet black printers ink. It's sharp looking and will never come off. We believe in selling a high quality product that sets industry standards
 
 
Make sure to stop by both their sites today and find a little inspiration along the way!  There's even a special offer going on now - you can use the code 100ProofPress10 to get 10% off your order in the Gauche Alchemy store!!!
 
 
Now onto my project!!!
 
 
For my project I decided to alter the back side of an 8 x 10 canvas, turning it into a framed shadowbox. 
 
 
The Gauche Alchemy papers were used for the background, the frames border, paper piecing all the clothes and all the fun cut out words.  Oh and don't forget that perfect little dove!
There was so much fun stuff to use, from old magazine clippings to fun little nick knacks, and you will definitely be seeing more with their product!!!
 
 
Everything has been dimensionally placed to create wonderful depth.  It's a little hard to see all the depth, but hopefully this picture helped to capture it.
 
 
Left behind on a cliff, (haven't decided if the little girl made an escape, or she was the only one who could be rescued)  The cliff was hand drawn and popped so this little lass looked like she was sitting in the forefront. 
But, I guess it's all in the optics....
 
 
I really couldn't have planned all of these stamps to go together any better! Absolutely love the Bolt Hot Air Balloon!! 
 
 
The background was inked using Distress inks.  Hand cut shapes made the perfect mask to create fluffy white clouds. 
 
 
And last, but not least this fun metal drawer pull from G45 is perfect for the words Close -Up, cut from some yummy magazine clippings from Gauche Alchemy!!
 
Stamps Used:
4584T, 4991T, 3240T
 
Thank you so much for stopping by today and joining in the Hop!
Have an amazing Tuesday!
Nicki Chicky


Monday, October 15, 2012

Paper to Canvas Transfer Using Graphic 45 Papers

Hello. and Happy Monday!!
My day was already off with a kick, somehow ,my brain wasn't working last night, and I turned on the wrong alarm clock.  We woke up just as my daughter's school bus was driving off.  In a mad dash we ate, filled out any papers and drove like the wind to get her there on time!  Whew, such excitement for 7:30 am..  And now for a little more excitement, because today I have a fun little tutorial to share with you!
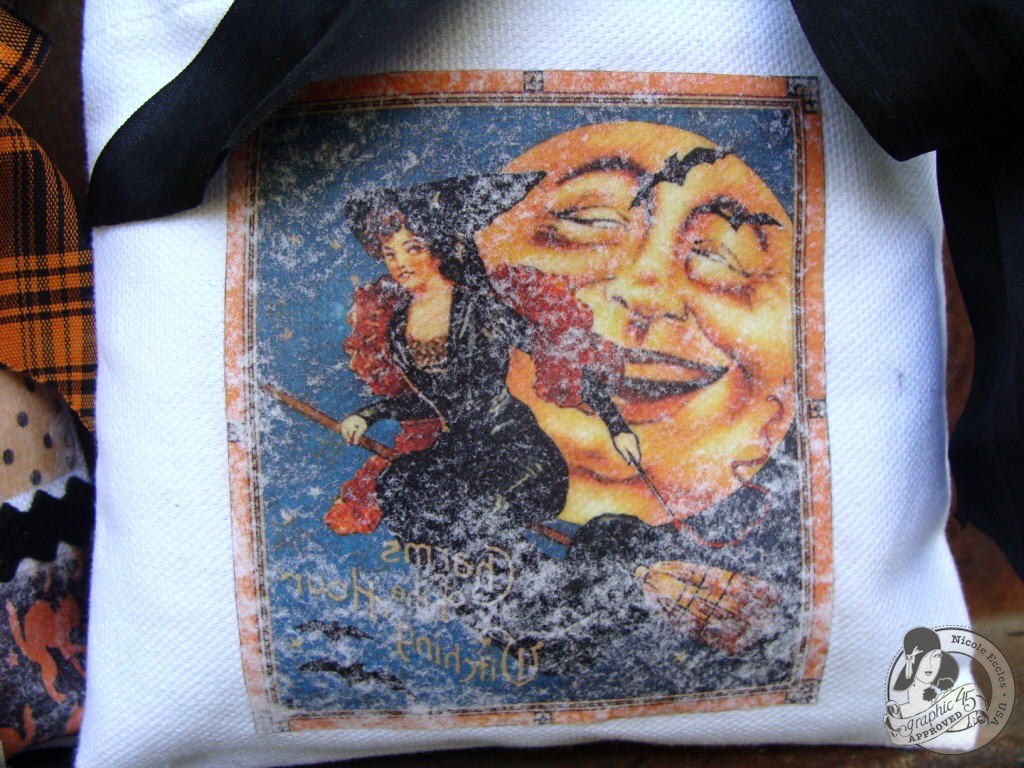
This is a quick and easy little technique for creating unique Halloween Treat bags. It is also a great way to use up those left over little strips of paper too!
The small canvas bags can be found at any of your local craft stores and come in a variety of sizes. This technique is also great for transferring those original photos, or magazine images to fabric.
Once you get started you won’t want to stop, creating transfer images for clothes, hats or purses. Just make sure if your item gets dirty, to hand wash only!!!


Supplies Needed for Paper to Fabric Transfer Technique:
Gel Medium or Mod Podge
Paint Brush
Image
Fabric, or Canvas Bag

 
Step 1. To get started choose your image you wish to transfer and paint a heavy coating of Gel Medium directly over the image
 
 
Step 2. Place the image face down onto the canvas bag, rubbing firmly into place. Allow a few hours to dry, or speed up the process with a blow dryer.
 
 
Step 3 & 4 Once dry, use a small mister bottle or your hand to sprinkle water along the back of the surface and allow to soak in.
 
 
Step 5 Once the water has soaked in, use your fingers rubbing in a small circular motion to gently remove to top layers paper, slowly revealing your image
 
 
Repeat a small addition of water and rubbing to desired effect. But don’t rub too hard, you can rub right through your transfer image
 
 
For protection seal with a thin layer of Gel Medium.
 
*Note: If using images with words, they will transfer backwards. 
This process also works with images you print off yourself, just make sure if it has words to reverse the image!! 


Supplies Used:
Graphic 45 Papers:
Happy Haunting- Happy Haunting,Jeepers Creepers, Halloween Greetings,Fright Night

May Arts: Ribbon and Ric Rac
Other: Gel Medium, Paint Brush, Canvas Bag, Halloween treats and décor
 
 
That's it for today!  Thanks so much for stopping by!  Come back tomorrow for a fun stamped project created for 100 Proof Press Blog Hop!!
Have an amazing Monday!!
 
Nicki Chicky


Tuesday, October 9, 2012

Graphic 45's Happy Haunting Ornaments and Tutorials

 
Greetings and Salutations on the brisk, lovely Tuesday morning!!!
 
Today I have for you 3 different ornament ideas for the Holidays.  Whether it be for Christmas or Halloween, these techniques can easily be used for any Holiday celebration!!
So lets waste no time getting to the good stuff....


First up are these classy, yet simple glass ornaments.  The glass ornaments can be found at your local craft store, and lend lots of possibilities when it comes to decorating them. 
Here is a little how to...
 
 
Supplies Used for Happy Haunting Glass Ornaments:
Graphic 45 Papers:
Happy Haunting: Man in the Moon, Pumpkin Time
G45 Metal Staples: Ornate Metal Keys
Ranger: Glossy Accents
Other: Confetti, tinsel, hot glue
Once your image is on, you can take the top off and add a little fun inside the ornament.  Hang some Graphic 45 ornate keys at the top to add interest.  Add some tinsel, or even just a ribbon.  
The possibilities for decorating these babies is endless!!!
 
Next up, I have a couple bottle cap ornaments!!


Bottle Cap Ornament Tutorial
1. Cut out desired images for ornament from Graphic 45 Happy Haunting line
 
2. Adhere round cut image to bottom of bottle cap
 
3. Using hot glue, adhere tinsel around the outside edge of the bottle cap
 
4. Cut 2 different colored pipe cleaners to desired size for handle. Mine was 8”
 
5. Gently twist the two pipe cleaners together for a more decorative look
 
6. Bend into a U shape for the handle, making sure it is even at the bottom
 
7. Adhere handle into bottle cap using hot glue
 
8. Cut a scrap piece of heave chipboard to run along the back of your cut image to ensure stability. Bend slightly at feet.
 
9. Adhere image using hot glue on chipboard tab, place underneath handle making sure image is straight
 
10. Using hot glue, moss, torn paper, or tinsel cover the inside of the bottle cap for a finished look
 
11. Cut out small strip that says Halloween from G45 papers. Taper at the ends like a ribbon
 
12. Adhere to front of bottle cap
13. Create a small crepe paper rosette by pinching a little crepe paper at a time to create a circle. Glue in the center, and adhere to top of pipe cleaner handle
14. Peel and stick clock from G45 Happy Haunting Sticker sheet. Trim rosette if necessary.
15. Peel and stick the word greetings and place along the clock face. Hang and enjoy!!!
 
Supplies Used for Bottle Cap Ornaments:
Graphic 45 Papers:
Happy Haunting: Trick or Treat, Midnight Magic
Happy Haunting Sticker Sheet
May Arts: Giant Bottle cap
Imaginarium Designs: Chipboard fence
Other: Pipe cleaners, hot glue gun, tinsel, crepe paper, moss
And last but definitely not least, the vintage style pipe cleaner ornaments. 
These are something that can easily be made with a little one.  The characters you can create using G45 papers is endless!!


Pipe Cleaner Ornament Tutorial
1. Cut out desired G45 images for head and hat of ornament
2. Cut a slip in the hat so it can fit on the pumpkin
3.Open your slit up slightly by pinching the sides toward the center
4. Place hat on head of pumpkin and adhere. Set aside head for later
5. Bend pipe cleaner 90 degrees to the left to create the left arm. Leave about 1/2” sticking up for the neck
6. Bend pipe cleaner back on itself towards the center to create the left arm. Arm should be approx 1/2”.
7.Tuck the pipe cleaner behind the neck. This should leave it sticking out the right side, ready to create the right arm
8. Bend pipe cleaner back on itself towards the center to create the right arm. Arm should be approx 1/2”.
9.Tuck the pipe cleaner behind the neck again, this time bending the pipe cleaning downward to create the left leg. Pipe cleaner should resemble a t.
10.Bend pipe cleaner back on itself towards the center to create the left leg. Leg should be approx 1/2”- 3/4”.
11.Tuck the pipe cleaner behind the neck again, this time bending the pipe cleaner downward towards the right to create the right leg. Pipe cleaner should resemble a star. Trim down right leg if necessary to even them out.
12.Adhere head with hat using hot glue. Don’t leave a long neck.
13. Fold a short piece of crepe paper in half to create a skirt.
14. Gently pinch a pleated look to the crepe paper
15. Adhere to pipe cleaner person right at the cross over in the center. Wrap all the way around and snip off to complete.
16. Using scissors to create small slits in the skirt, this will give it a fluffier look
17. Tie a loop in a piece of bakers twine and adhere to the back of the ornament head
18. Add a fun Halloween sign from G45’s Happy Haunting Sticker Sheet. Hang and enjoy!
 
Supplies Used for Pipe Cleaner Ornaments:
Graphic 45 Papers:
Happy Haunting: Trick or Treat, Bewitched
Happy Haunting Sticker Sheet
May Arts: Baker’s Twine
Other: Pipe Cleaners, crepe paper, hot glue gun, scissors
That's all for Today!!  I hope you have enjoyed the tutorials and are ready to try your hand at some Holiday Ornaments!  Whether you give them as gifts, or just share in the fun with family, handmade ornaments are a very special treat!!
Thanks so much for stopping by!
 Have an amazing day!
 
Nicki Chicky


Thursday, September 13, 2012

100 Proof Press Blog Hop!!!


Hello and Welcome Hoppers!!! 
 
Thank you so much for stopping by and joining in on the fun on this lovely Thursday!
If you are just joining in, 100 Proof Press is holding a blog hop today jam packed with inspiration and of course some great prizes!!! 

Here is what you could win:
 One Pack of Postage Paper Style #5,
Postage Parts #5,
and a gift certificate to the shop for $30.00!!!
 All you have to do is leave your comments along the way the be entered for your chance to win!!

 
If you are interested in finding out a little more about 100 Proof Press, click here!
They are a wonderful stamping company that I was lucky enough to find here in Ohio at Stampaway. 
Now a year later, I have joined on in the adventures of stamping with the wonderful design team and all of their amazing rubber stamp creations!!
 
Here is a schedule for the hop so you can jump in at any time,
 and keep coming back for more!
Nicole Eccles www.NicoleEccles.com<-----YOU ARE HERE


Today I have for you some quick spooky Halloween Inspiration to share!

 
This 5 1/2" x 5 1/2" Wood Art Block is simply made with only a few steps and some Mod Podge.
Combing the simplicity of black and white stamping with clipart. 
 
 
I absolutely LOVE the glazed over zombie like stare of this Skeleton!!  His eyes were just perfect for adding a touch of red with some yummy bling!
 
 
Stamp, or adhere paper along the edge of the block for a finished look.  To make it look more warn an aged, sand down corners till rounded, then ink before sealing with Mod Podge.
 
Supplies Used:
 
100 Proof Press: 4553 R ( Skull)
Webster's Pages
Want 2 Scrap Bling
Staz On Jet Black
Ranger: Frayed Burlap Distress Ink
 
Other:  wooden block, sand paper, Mod Podge, Clip art, Printer
 
 
Up next I have a delightfully toxic little Shadobox!
 
 
Though I love to color in my stamped images.  There is just something about using black and white images with just touches of color that can really make your project pop. 


Though it may be hard to tell from the picture, but each little image inside the box has been dimensionally placed using 3D Foam squares.  This helps to give more depth, but to really bring the whole scene together.
 
 
Combining 100 Proof Press Stamps with clipart, scrapbooking supplies and other stamps is so easy, you won't want to stop once you get started!!!!
 
Supplies Used:
100 Proof Press: 3643 U (witch)
Reminisce Labels and Patterned Paper
Martha Stewart Halloween Stamps and papers
Scrapbook Adhesives : 3D Foam Squares
Ranger: Lime Stickles
 
Other: 4x4 Shadowbox
 
 
Thank you so much for joining in the hop today!!
 
Hopefully we have all left you running for the scrapbook room to get started on your next creative journey!!
Wishing you a safe and relaxing weekend!!!
Nicki Chicky


Monday, September 10, 2012

Altered Steampunk Halloween Clock w/ Graphic 45

Hello and Welcome on this gorgeous Monday!!   Today I am excited to share with you some more Halloween inspirations using Graphic 45 papers! 
If you didn't already know Halloween is my favorite Holiday, and I can never get enough of it!
So onto the inspiration!!!!
 
 
This is the clock before I got my hands on it.  It used to work, but stopped working awhile ago so I decided to give it some new life.  As you can see I took all the insides out so that I could start with a clean slate. 
And now for the after......


 Covered with a total of 6 different Graphic 45 lines.  Then the whole thing was distressed by inking and then dry brushing with a little black paint and gesso for that old world look. 
 
 
Up top, I created what looks like the insides of a clock by using plastic gears from a toy clock along with Chipboard gears cut from Sizzix/Tim Holtz gear die. 
All hand painted to match with an aged silver acrylic. 
 
 
To make my life easier, I created a false back out of chipboard to place inside the clock.  This way I wasn't having to build 100's of layers just to get all the gears closer to the opening. 
Once the false back was painted black and put into place, I then covered it completely with Chipboard gears, all interlocking for my base.  This gave the appearance of depth and added more interest with layering.  After that dried, I strategically placed all the gears, gluing as I went.  If there was an open spot, I would try to figure out how to get more gears in until I felt it looked full enough. 
 
 
I love the little added knickknacks to the inside.  Decorated with a few gems from Want 2 Scrap and of course the wonderfully creeping skeleton hand.  The cameo of the man was cut from G45's A Proper Gentleman line..Gives me chills just looking at it!
 
 
Down below a Halloween scene takes shape.  Using the cover from a Want 2 Scrap mini book created the perfect spooky looking backdrop.  Also it created the perfect frame for the spooky pendulum that really swings!!
 
 
The little lady from Steampunk Debutante is perfectly dressed for the occasion.  With her dress of orange, and even her top hat she is ready for a Halloween party!  The chair was a piece of clip art that I had and just worked perfectly into the scene.  For stability, each hand cut image was backed with heavy duty chipboard and  given a stand just like a paper doll.

 
A haunting scene, complete with pumpkins, potion bottles and even a creepy skeleton. 
In the background you can get a glimpse of the Nutcracker Sweet Grandfather clock! 
To make it look less Christmasy and more Halloweeny I used a Sharpie marker to color over all the Holly. 
 
 
Up above, a tiny paper banner brings in the season.   Created with the lovely Happy Haunting line and Girl Paperie Banner Stamp. 
 
 
Along the outside, Skeletons stand guard with their backs against the pillars. 
These are just plastic Skeletons you can find at any craft store from now till Halloween!
 
 
I was so happy that this clock had a drawer so I could use the brand new G45 Drawer pulls!  They are just amazing!!!  On either side are glittered decorative clock hands, just the perfect touch of black that tied right into it.
 
 
On the sides of the clock, G45's metal tags add a simple but stunning look.  Topped with a sticker from the Happy Haunting line, then distressed using gesso to match the look of the clock. 
 
 
Supplies:
Graphic 45 Papers:
Want 2 Scrap: Bling, Chipboard lace frame
May Arts: Black and white bakers twine
Ideology: Mini glass vials, orange Adirondack Ink
Ranger: Glossy accents as adhesive, Black Soot Distress Stickles
Girl Paperie: Jubilee Clear Stamps ( Pennant Banner)
Scrapbook Adhesives: 3D Foam Squares
Sizzix: Gear Dies, Big Shot
Bazzil: 12 x 12 Chipboard
Other: gesso, gel medium, sand paper, orange/black/silver acrylic paint, drill, clipart, printer, Halloween décor, pumpkin pods, Old clock, plastic clock toy for gears, stamped metal star


Well that's it for today!!  Thank you so much for stopping by and checking out my creations!! 
I hope you are now running out to find some fun little clock to alter to bring in the Halloween Season!!
Happy Haunted Creations!!!
Nicki Chicky