Graphic 45 and May Arts have joined forces to bring you the best inspiration ALL WEEK LONG!!
Not only will you find some great ideas along your way, but there are tons of prizes to be won!!
12x12 Little Darlings Paper Pad, 1 Set of Little Darlings Stamps, 1 package of Chipboard Button Staples, and two spools of May Arts Ribbon.
Here is a little info about both fabulous companies...
Also in the celebration of this masterful duo, I have also decided to hold a little giveaway of my own!
To win, simply become a follower of my blog and leave a comment under this post.
If you are already a follower just let me know in your comment.
That simple...
The winner will be chosen at random on Monday, June 25th from their comment left here on my blog.
Here is what I will be giving away!
8x8 Pad Little Darlings, 8x8 Pad Tropical Travelogue, Little Darlings Chipboard, Want 2 Scrap flourishes, a yard of May art Ribbon and a set of my handmade paper flowers
Whew, now that we have all the excitement out of the way, how bout a little inspiration?
Today I have a handful of fun birthday inspired projects to share with you,
including a few quick tutorials!
June is Birthday month in my family, with a total of 4 Bdays, including one of best friends'..
Mom!
So I decided to create some handmade goodies, special made just for her using yummy Graphic 45 papers and luscious May Arts ribbon.
First off, I created a fun baker's twine cupcake. This is an idea that I had previously seen, and decided to take it to the next step by turning it into a gift box.
Created using a 3" foam ball, cut into half and a chipboard base.
The chipboard cupcake base was purchased at Michaels.
However, it could easily be duplicated using a terra cotta pot, or for smaller cupcakes use a dixie cup instead.
These would make great party favors for the little ones, and they can even help make them!
The cherry used for the top, is a Graphic 45 Metal Button stained red with Alcohol Inks.
Small beads and Want 2 Scrap pearls make the perfect sprinkles!
Add a bit of fancy May Arts beaded lace around the edge for a touch of elegance and the look of icing.
Here is how to make the cupcake top for a gift box.
If creating just as a cupcake and not a lid, DO NOT cut your foam ball!
Supplies Needed:
3" foam ball, May Arts bakers twine(atleast 3 yards), paint brush, Mod Podge
Step 1: Carefully cut the 3" foam ball in half using a sharp knife.
Step 2: Start creating a spiral of twine within your fingers. Coiling it into a flat circle around itself.
Step 3: Once your Coil is about the size of a quarter, paint a quarter sized thin layer of Mod Podge onto the center of your foam ball half and adhere coil to the center.
Step 4: Continue painting on small amounts of Mod Podge, coiling the bakers twine as you go until fully covered.
Once complete decorate the top as desired using small beads and brads for sprinkles.
To make it look more like icing, lightly sprinkle with fine glitter.
When I went to decorate my cupcake, I found the only colors of bling I had were white.
To make them pop, I added a couple small drops of Alcohol inks, let them dry a second, and then wiped away the excess.
What other sweet treats can you create with Bakers Twine!?!
Well here are a few little accents that were super simple to make that almost look like decorative cookies.
Cupcake Supplies Used:
Graphic 45 Papers:
A Ladies Diary- Focal Point
Graphic 45 Staples: Metal Frads
May Arts: Bakers Twine, Beaded Lace Trim
Want 2 Scrap: Pearl Bling
Ranger: Glossy Accents, Alcohol Inks( Periwinkle, Seashel Pink, Cranberry, Lemonade)
Scor Tape
Other: Mod Podge, Foam Ball, Paint Brush, Beads, Chipboard Cupcake bottom
Second on the list Mom's presents is this cute Paper Mache Flying Pig Pull Toy!
This chipboard pig was something that I actually found at Meijers in their dollar bins. (Gotta love those dollar bins). Starting out as a Kraft Colored pig, I decided to paint him soft pink and give him a nice distressed finish by dry brushing brown over top, and wiping away the excess.
His base is created out of two wooden blocks, glued together then covered with Graphic 45's New Ladies Diary paper. I then sanded the edges down, and inked to an aged perfection. Followed by a layer of Mod Podge for protection, then the final step of hamming it up with some distress stickles.
One of Graphic 45's Metal Tags made the perfect backdrop for the word When, along with flowers cut from A Steampunk Debutante line and finished of with a pearl flourish from Want 2 Scrap.
Once the blocks were dry I was able to add one of Graphic 45's Metal Buttons to create the perfect pull string connector. Using May Arts Bakers twine of course!
The wheels were then inked and added to the cart, topped off with Graphic 45's Chipboard Buttons for decoration.
And the best part of all, this toy really rolls!
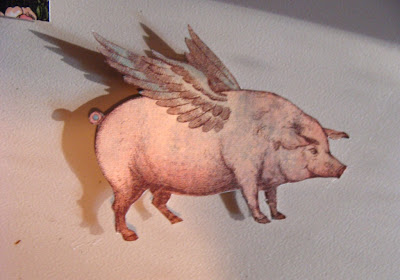
The wings were created by stamping out the image twice.
One image was glued to heavy cardboard then hand cut out. The other was fussy cut first, then added to the other side of the pre cut chipboard wing. Bent slightly, then adhered using Glossy Accents for a quick strong hold. I then back it with a dab of Glossy accents and allowed them to dry.
Once they were dry I sealed both sides with with a few layers of Mod Podge for protection.
Top the whole thing off with a handmade paper top hat, and your pig is ready to take flight!
Supplies Used:
Graphic 45 Papers:
A Ladies Diary- A Garden Stroll
Olde Curiosity Shoppe-When Pigs Fly
Steampunk Debutante- Fantasy Floral
Graphic 45 Staples: Metal Tags, Metal Buttons, Chipboard Buttons
Coredinations: Sanding Block
May Arts: Ribbon and Bakers Twine
Want 2 Scrap: Pearl Flourish
Ranger: Glossy Accents, Distress Stickles (Tumbled Glass, Rock Candy) , Frayed Burlap Distress Ink
7 Gypsies: Metal Gears
Stampers Anonymous: Angel Wings
VersaFine: Black
Other: 2" Wooden blocks, Mod Podge, E6000, Wooden wheels, Chipboard, black cardstock, pink and brown paint,
And last of all, what gift is complete without a handmade card to go with it!?!
And what perfect papers to use but Olde Curiosity Shoppe that just happens to feature a flying pig.
Supplies Needed to create Center Step Card:
One 5 1/2" x 11" piece of cardstock for card base
Scor-Pal™, or other scoring tool
Paper trimmer
Adhesive
Step 1
Line cardstock up in the paper trimmer so that the edge of the card is at the 1" mark. Position the cutting blade at 1" and cut from 1" to 6.5", creating a slit
Flip card over and do the same on the other side.
Step 2
Place the card onto the scoring tool horizontally and score along the long side of the card from the edge to the cut line at 1", 2" and 6.5".
Step 3
Repeat step 3 on opposite edge of card.
Step 4
Score between the cut lines at 5 1/2".
Once ALL lines have been scored and cut, it should look like this
Step 5
Fold at the score lines. The first, third and center score lines are mountain folds. The second score line is a valley fold. Reinforce score lines to make folds crisp.
Step 6:
Cut front of card to 5 1/2" x 5 1/2". Cut 1" off each side, leaving a 1"tab at the bottom.
Step 7: Flip over patterned paper to reveal black and floral paper.
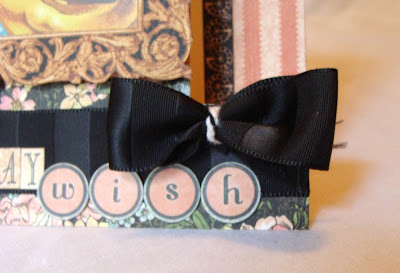
Adhere ribbon along bottom strip, lining up along top edge
Adhere to front of card.
Step 8:
Adhere 1" pink strips along the sides of card
Step 9:
Cut a 3" x 3 1/2" rectangle from Little Darlings Baby Borders and adhere to the center of the black floral paper.
Step 10:
Cut out from paper, or remove Sticker moon from Graphic 45's Happy Haunting line and lightly adhere in right corner of blue paper.
Step 11:
Cut out frame from Olde Curiosity Shoppe: Parlor Wall, and remove center image using scissors or kraft knife.
Flip over and place pop dots
Step 12:
Adhere to card framing the blue background. Adjust moon if necessary and firmly adhere
Step 13:
Cut out pig from When Pigs Fly Paper. Flip over and adhere pop dots only to the top area of pig
Use adhesive to glue the bottom half of the pig to the card. This will help to create more depth to your card. Adhere flying over moon!
Step 14:
Cut clock borders from Bazaar of Wonders Paper and adhere along inside edges of pink border, trim if necessary
Step 15:
Cut out leaves and foliage from Tropical Travelogue line, adhere to card
Step 16:
Cut the letter B from An ABC Primer. Adhere to card and finish off greeting using A Ladies Diary Alphabet stickers
Step 17:
Create a small bow out of the black satin ribbon. Last adhere to the right side of card
Center Step Card Supplies Used:
Graphic 45 Papers:
A Ladies Diary- Focal Point
Olde Curiosity Shoppe-Bazaar of Wonders, Parlor Wall, When Pigs Fly
Tropical Travelogue- Island Jewel, Rainforest
Graphic 45 Staples: Ladies Diary Alphabet Stickers
Happy Haunting Stickers
May Arts: Black Satin Ribbon, Bakers Twine
Colorbox: Aqua Cats Eye
Scrapbook Adhesives: 3D Foam Squares
Ranger: Glossy Accents
Tombow: Glue Stick
Martha Stewart: Scor Board
Fiskars: Rotary Paper Trimmer
Many thanks for your visit today and taking your time to join in the Hop!!!
Lot's more inspiration to come all week long!
See below for a schedule of where to go next, and what to look forward to all week.
And don't forget to leave your comments along the way for a chance to win a great prize pack from Graphic 45 Papers!!!
Plus leave your comment here on my blog for a chance to win my prizepack!
Happy Hopping!
Nicki Chicky
XOXO


